You can use below HTML Functions/Tag in your PL/SQL Reports.Now its easy to play with Excel Farmulas/Functions using PL?SQL.
Introduction
The focus of the article is to show the developers how to generate a dynamic Excel sheet from HTML. This article includes some sample programs to show how to implement various Excel functionalities with the help of HTML. The prerequisite of these programs is, you should have Microsoft Office Excel installed in your PC. This article expects you to have the basic concepts HTML and Excel programming for better understanding.
Before starting you need to know about Namespaces/Uniform Resource Name and Meta Tag used for Microsoft Office Excel Application.
Meta Tag
HTML includes the meta element that goes inside the head element. The purpose of the meta element is to provide meta-information about the document. To generate an Excel sheet in HTML, the following meta information should be included under the Header Section:
<meta http-equiv=Content-Type content="text/html; charset=windows-1252">
<meta name=ProgId content=Excel.Sheet>
<meta name=Generator content="Microsoft Excel 11">
Here is an example to generate a simple Excel sheet:
<html >
<head>
<meta http-equiv=Content-Type content="text/html; charset=windows-1252">
<meta name=ProgId content=Excel.Sheet>
<meta name=Generator content="Microsoft Excel 11">
</head>
</html>
Namespace/Uniform Resource Name
In the above section we see how to generate an Excel sheet. Here we will see how to define Office objects. There is no specific HTML tag for Microsoft Office Objects, we need to use custom tags to define Office and Microsoft Excel Objects. Custom tags should have a unique Namespace or Uniform Resource Name. The following code snippet shows the required xmlns [XML Namespace] for Office and Excel:
<html xmlns:v="urn:schemas-microsoft-com:vml"xmlns:o="urn:schemas-microsoft-com:office:office" xmlns:x="urn:schemas-microsoft-com:office:excel"xmlns="http://www.w3.org/TR/REC-html40">
</html>.
We will see more detailed usage of the namespace in the subsequent sections.
Custom Document Property
The Custom document property allows you to define your own property. In the following example we will see how to define Office custom properties in HTML:
<html xmlns:v="urn:schemas-microsoft-com:vml"xmlns:o="urn:schemas-microsoft-com:office:office" xmlns:x="urn:schemas-microsoft-com:office:excel"xmlns="http://www.w3.org/TR/REC-html40">
<head>
<meta http-equiv=Content-Type content="text/html; charset=windows-1252">
<meta name=ProgId content=Excel.Sheet>
<meta name=Generator content="Microsoft Excel 11">
<title>Document and Custom Property </title>
</head>
</html>
If you look closely at the preceding code you will notice an IF block like the following:
This piece of code is checking the availability of Microsoft Office. It is good practice to add this piece of code before defining a property. If you save the preceding code as HTML and open as Excel then it will have the following custom property:

Figure 1:
Data Validation
Special custom tags are also available for data validation.
For example: The following tags are used to represent various properties of data validation.
<x:DataValidation>
<x:Range></x:Range>
<x:Type> </x:Type>
<x:Qualifier> </x:Qualifier>
<x:Value></x:Value>
<x:ErrorMessage> </x:ErrorMessage>
<x:ErrorTitle> </x:ErrorTitle>
</x:DataValidation>
The following table explains the preceding tags:
| Tags | Descriptions |
Defines the range where validation is applied.
| |
Tells about Validation Type like Whole, Decimal, TextLength,Custom ect
| |
Defines comparison parameters like Greater, Equal, NotEqual, Less, GreaterOrEqual, LessOrEqual ect
| |
Defines an expression or value for validation
| |
Defines customized Error Message.
| |
Title of the error message.
|
The following example will help you to understand the above syntax better:
<html xmlns:v="urn:schemas-microsoft-com:vml"xmlns:o="urn:schemas-microsoft-com:office:office" xmlns:x="urn:schemas-microsoft-com:office:excel"
xmlns="http://www.w3.org/TR/REC-html40">
<head>
<meta http-equiv=Content-Type content="text/html; charset=windows-1252">
<meta name=ProgId content=Excel.Sheet>
<meta name=Generator content="Microsoft Excel 11">
</head>
Split Pane
A split pane can also be done using custom tags. The following custom tags are used to do that:
<x:SplitHorizontal></x:SplitHorizontal>
<x:SplitVertical></x:SplitVertical>
SplitHorizontal is used for horizontal split and tag specifies the number of rows of the top pane and SplitVertical is used for the vertical split and tag specifies the number of columns on the left pane. There are another two tags for configuring the split pane; they are:
<x:TopRowBottomPane></x:TopRowBottomPane>
<x:LeftColumnRightPane></x:LeftColumnRightPane>
These two proerties specify the start row of the bottom pane and the start column of the right pane. The following is a simple example that implements the preceding tags:
<html xmlns:v="urn:schemas-microsoft-com:vml" xmlns:o="urn:schemas-microsoft-com:office:office" xmlns:x="urn:schemas-microsoft-com:office:excel"
xmlns="http://www.w3.org/TR/REC-html40">
<head>
<meta http-equiv=Content-Type content="text/html; charset=windows-1252">
<meta name=ProgId content=Excel.Sheet>
<meta name=Generator content="Microsoft Excel 11">
</head>
<body></body>
</html>
The output of the above code will be:
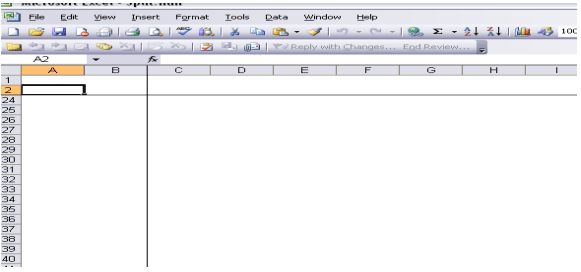
Figure 2:
Excel Formula and NameRange
In this section we will see how to implement an Excel formula and namerange. An Excel formula is placed inside the HTML table.
For example:
<table>
<tr>
<td x:num x:fmla="=SUM(C1,D1)">0</td>
<td x:num x:fmla="=SUM(D1,E1)">0</td>
</tr>
</table>
<table>
<tr>
<td> <a name="NameRange1">0</a></td>
<td ><a name="NameRange2">0</a></td>
</tr>
</table>
The following is an example for an Excel formula and namerange implementation:
<html xmlns:v="urn:schemas-microsoft-com:vml"xmlns:o="urn:schemas-microsoft-com:office:office" xmlns:x="urn:schemas-microsoft-com:office:excel"
xmlns="http://www.w3.org/TR/REC-html40">
<head>
<meta http-equiv=Content-Type content="text/html; charset=windows-1252">
<meta name=ProgId content=Excel.Sheet>
<meta name=Generator content="Microsoft Excel 11">
</head>
<body >
<table>
<tr>
<td x:num x:fmla="=SUM(C1,D1)"><a name="NameRange1">0</a></td>
<td x:num x:fmla="=SUM(D1,E1)"><a name="NameRange2">0</a></td>
</tr
</table>
</body>
</html>
Grouping
The various outline levels of grouping can be defined inside the
element of HTML table. The following table row belongs to the level 1:
<tr style='mso-outline-level:1;'></tr>
The following code snippet demonstrate the grouping implementation:
<html xmlns:v="urn:schemas-microsoft-com:vml"xmlns:o="urn:schemas-microsoft-com:office:office" xmlns:x="urn:schemas-microsoft-com:office:excel"xmlns="http://www.w3.org/TR/REC-html40">
<head>
<meta http-equiv=Content-Type content="text/html; charset=windows-1252">
<meta name=ProgId content=Excel.Sheet>
<meta name=Generator content="Microsoft Excel 11">
</head>
<body >
<table
<tr><td></td></tr>
<tr><td></td></tr>
<tr><td></td></tr>
<tr style='mso-outline-level:1;'>
<td></td>
</tr>
<tr style='mso-outline-level:1;'>
<td></td>
</tr>
<tr style='mso-outline-level:2;'>
<td></td>
</tr>
<tr style='mso-outline-level:2;'>
<td></td>
</tr>
<tr style='mso-outline-level:2;'>
<td></td>
</tr>
<tr style='mso-outline-level:2;'>
<td></td>
</tr>
<tr style='mso-outline-level:1;'>
<td></td>
</tr>
<tr>
<td></td>
</tr>
<tr>
<td></td>
</tr>
<tr>
<td></td>
</tr>
<tr style='mso-outline-level:1;'>
<td></td>
</tr>
<tr style='mso-outline-level:1;'>
<td></td>
</tr>
<tr style='mso-outline-level:2;'>
<td></td>
</tr>
<tr style='mso-outline-level:2;'>
<td></td>
</tr>
<tr style='mso-outline-level:2;'>
<td></td>
</tr>
<tr style='mso-outline-level:2;'>
<td></td>
</tr>
<tr style='mso-outline-level:1;'>
<td></td>
</tr>
<tr>
<td></td>
</tr>
<tr>
<td></td>
</tr>
<tr>
<td></td>
</tr>
</table>
</body>
</html>
The output of the above code will be like this:
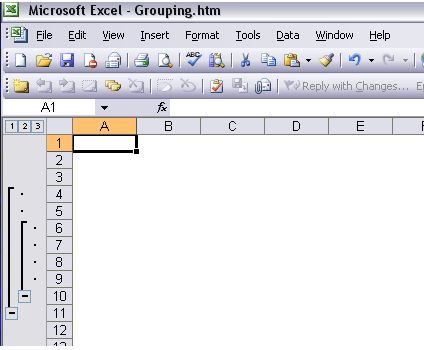
Figure 3:
Conclusion
Excel has a wide range of usage, this topic would be helpful for those who want to invoke an Excel component from a web application to support Excel's inherent functionalities like formulas, grouping and such.